| VISAT Plug-In development with Eclipse | |
The following chapter will guide you step by step through the creation and configuration of a new Eclipse project for VISAT Plug-In development reasons.
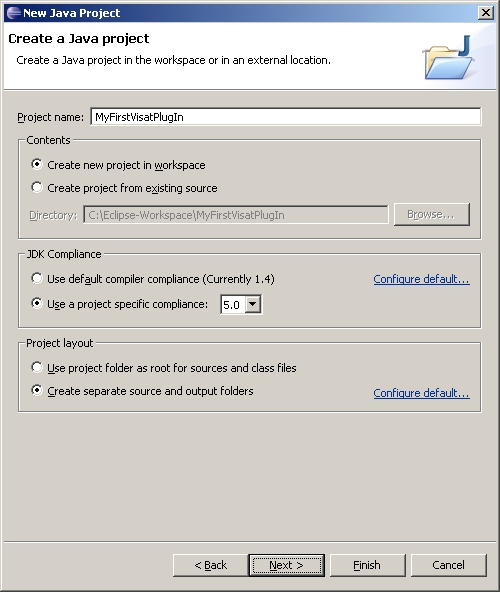
The Java Project Wizard will help you creating a new Eclipse Project. You can start the Java Project Wizard by clicking File > New > Project, selecting "Java Project" from the wizard list and pressing the Next button. It takes two steps to create the new project.
Step One:
- Enter a name for your new VISAT Plug-In project into the "Project name" field.
- Set the "Create new project in workspace" radiobutton.
- Set the "Create separate source and output folders" radiobutton.
After clicking the Next button a new dialog window containing four tabs "Source", "Project", "Libraries" and "Order and Export" will appear.
Step Two:
- Select the "Libraries" tab.
- Click the Add Library... button.
- Select "user library" from the list.
- Select the "user library" you have created in the chapter Configuring Eclipse.
- click the Finish button.
After pressing the Finish button Eclipse creates a new project folder in your workspace.
Within this folder you will find files and subdirectories storing your project configuration, a \src
directory for the source code of your plug-in and an output directory \bin, where
eclipse will store the compiled sources of your plug-in.
If you want VISAT to find and load your plug-in, you will have to put the compiled sources into
the \extensions subdirectory of your BEAM directory. You can let Eclipse do this
automatically for you by creating an output folder that is linked to the mentioned BEAM plug-in
directory.
Note: Unlike the "Java Perspective" the "Resource Perspective" does not hide data, that is irrelevant for writing, compiling and running java source code. All files and folders in your workspace will be visible after this step.
\extensions
folder of you BEAM directory.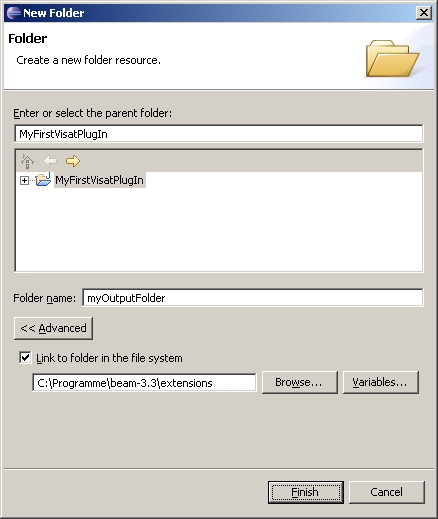
After clicking OK the new folder will appear in the directory structure of your project. Now you must set the new created folder as an output folder for your compiled sources.
Now that you have selected a new output folder the former output folder is useless. You can
delete it by right-clicking onto the \bin folder and selecting delete from the
contextmenu.
Now switch back to the "Java Perspective" by selecting Window > Open Perspective > Java.
Note: This approach works well as long as you only got one project writing
its binaries into a folder that is linked to the BEAM \extensions folder. Otherwise
Eclipse will overwrite all files in the \extensions folder with the binaries of the
project Eclipse has compiled last.
Though you haven´t written any code yet you can create now a run configuration for your plug-in so you are able to start VISAT out of Eclipse. You will need this for running, testing and debugging your plug-in.
Note: Since a VISAT plug-in is no independent application and can only be launched within VISAT you must search in the attached user library storing the BEAM binaries for a launchable class.
By now you can start VISAT by pressing the Run button. The VISAT splashscreen and a low memory warning will appear. VISAT will start after you have confirmed the warning.
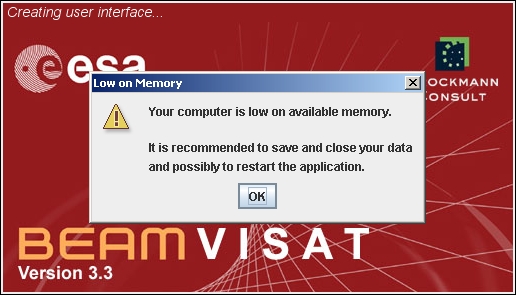
Till now you haven`t written any source code for the plug-in to execute, so your Eclipse will not find anything to compile and the output folder linked to the BEAM plug-in folder stays empty. VISAT will start with its basic features.
You can avoid the low memory warning with a little change in the run configuration. Open again
the run configuration (by clicking Run > Run...) and select the tab Arguments. Enter -Xmx256M
into the field "VM arguments" and apply the changes.
Note: The number behind -Xmx specifies the maximal amount of
memory in megabyte that is allocated for VISTA during runtime. The amount of available memory
depends on your hardware and the programs you are currently running.If possible you should allocate
512 Mb or more.
To ensure that VISAT will run correctly and will find all needed libraries stored in various
subdirectories of the BEAM home directory you should add the following variable declaration to your
"VM Arguments" field: -Dbeam.home=C:\eclipse-workspace\beam3
-Dncsa.hdf.hdflib.HDFLibrary.hdflib=C:\programme\beam-3.3\bin\jhdf.dll
-Dncsa.hdf.hdf5lib.H5.hdf5lib=C:\programme\beam-3.3\bin\jhdf5.dll
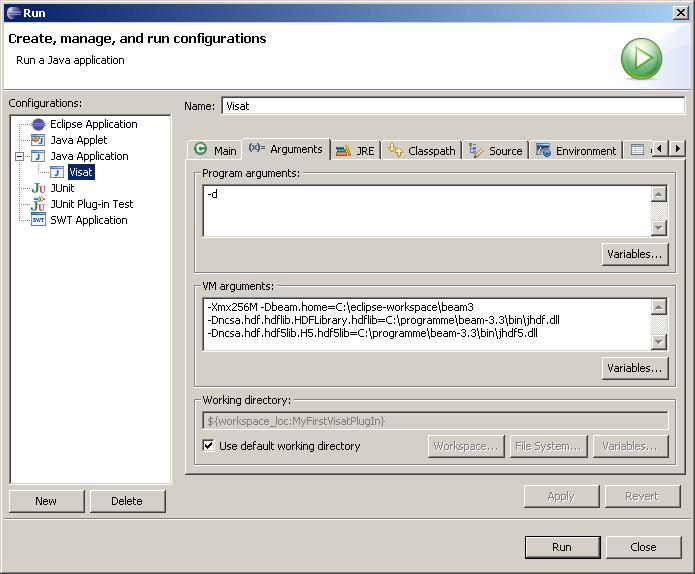
Enter -d into the "program arguments" field to start VISAT in debugging mode.
Note: The VISAT debugging mode provides status- and error-messages that will be displayed during runtime in the Eclipse Console. This feature can be very useful for testing and debugging your plug-in.
Apply the changes and start VISAT again. No warning will appear anymore. You can now take a look at the Eclipse Console to see the VISAT status-messages.
Now that you have got VISAT running, it is time to start with programming. The Basic class of
every VISAT plug-in is an implementation of the VisatPlugIn Interface. During startup VISAT will
search for implementations of the VisatPlugIn Interface in the \extensions folder of
your BEAM installation. It will automatically load all found implementation of this interface and
call their initPlugIn(VisatApp visatApp) Method. So you have to put your code
initializing your plug-in into this method.
Note: Implementations of the VisatPlugIn interface will still be found if they are stored in subfolders, .zip or .jar files.
Eclipse can automatically create a class implementing a public interface. It will leave the method bodies of the methods you will have to implement empty. Perform now the following instructions to create a new class implementing the VisatPlugIn interface.
Note: You should put VPI at the end of the class name to make
it identifiable as a VISAT plug-in.
Note: If you want to create a new package structure, you can simple enter the package name into the field labeled with package. If the entered package does not exist Eclipse will create it for you. In the following the example class will be created in the package "com.bc.beam.visat".
VisatPlugIn interface stored in the package org.esa.beam.visat
from the list.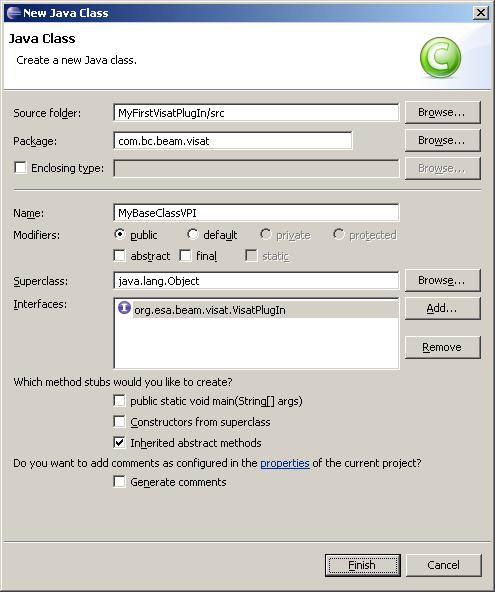
After you have confirmed the creation of the new class by clicking the OK button, Eclipse will create a new file with the class name you have entered and the file extension ".java".
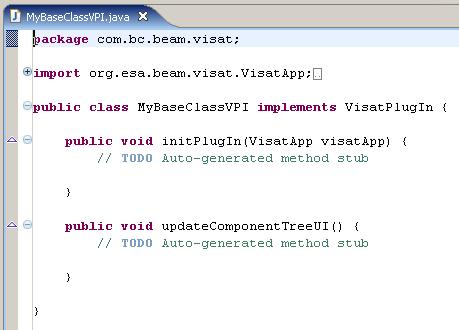
Eclipse will display the new created Java class in its editor window. You will find two empty
method bodies in this class. During start-up VISAT will directly call the InitPlugIn(VisatApp
visatApp) method, after it has found your class in the BEAM extensions folder. Use this
method to initialize your plug-in and to add menu-entries or toolbar-buttons calling your plug-in
functionalities to the VISAT-UI.
If the UI-Look and Feel of VISAT changes the updateComponentTreeUI() gets called. If
you want your plug-in to adjust its appearance to the VISAT Look and Feel, you will have to
implement the accordant functionality here.
Return to the MAIN PAGE